Posts

Showing posts from August, 2017

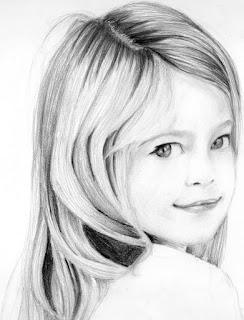
How I Draw: Brown Hair

        In this How I Draw, I will explain the wizardry of hair. Hair, along with the face, is the most essential part of a portrait. Getting the right feel and depth is very precarious to do, but it isn't impossible. I will be showing the four basic hair colors in four posts.          This post will be for the most simplest of them all: brown hair. I know there are many shades of brown hair, but this will be for dark brown hair. For a darker and lighter shades, change the colors respectively.          The colors used for this project are: -Black                           -Dark Brown -Light Umber -Sienna Brown -Ginger Root           When drawing hair, you always want to go lightest to darkest, because hair is all about the layers. In this case, start by stroking in the Ginger Root, then use the arrays of brown to add shadows, highlights, and other dimensions. Black should be blocked in for the darkest of shadows. For hair, I recommend blending the the colorles

Bella

Image
        This post is about my latest portrait, Bella. Bella is based of of this sketch of a 5-6 year-old. I intentionally made her look older, about 12-13 years old. Look-On         I did tweak the angle and hair a bit. Obviously, you can tell my drawing is the older version of the girl shown. The girl pictured doesn't have a name, so I gave her one. Like Lucy, Bella was named because of how it suited her looks and expression. Bella B&W Bella Colored Black shadows, lips and eyes (eye color: Hazel, colors used: Sienna Brown, Canary Yellow, Olive Green, Dark Green)... Face... Eyebrows and eyelashes,  neck,  shadows to the nose and eyes... Completed nose... Shirt, parts of background... Completed Part 1 of background...         Now, the part we've all been waiting for: Hair! This time, I decided to try ginger/red hair. The colors used, from lightest to darkest, are: Cream (as a base color) Goldenrod (used for line/shape definiti

Lucy

Image
      I am taking a break from the Harry Potter theme to experiment with other ages. The following look-on is a pencil sketch of a  4- or 5-year-old girl.            However, my copy, in my opinion, is slightly older, around 10-11 years old. I didn't stay true to the look-on when it comes to the hair and dress. However, her face is as exact as I can produce.  Black & White Look-On: My Copy:         As you can see, I kept the hair neater and added a headband. The top of the dress is much more simpler, and the straps are a different style. Her face looks a bit more wider because of the lack of shading. Colored:   I colored in the eyes a greenish-blue, using True Blue, Light Cerulean Blue, Indigo Blue, and Spanish Orange... Lips, with flesh tones, pinks, crimson red, and dark brown... Skin with peach and cream, blended with white... Completed skin, nose,  shadows with brown and colorless blender... Eyebrows and eyelashes; softer shadows

How I Draw: Skin

Image
        The skin is a tricky bit of wizardry; One must choose the right colors to get accuracy. I will show you how to draw skin on the same eye we just drew. It is only one part of the puzzle, but it is really up to the artist to choose where to add shadow and etc. Here we go! Here is what we have (I added the eyelid in with a brown ):         First, color in a light layer of cream on the area to be covered (it's okay if the black smudges a bit, you can fix it later).          Then, add a good layer of peach on top of the cream. If you want a more pale complexion, use light peach, whereas browns like light umber are good for a tanned look.           Use the white to blend.          Add more peach.  Blend again with the white. *Now, you can stop here, or you can add shadows and highlights. Read on for highlights and shadows .*         There are two shadows and two highlights to be added. First, the highlights. Using the cream, color in the area above

How I Draw: Eyes

Image
        I pride myself over the realism of the eyes I draw. Here is how I do it: ~~~~~~~~~~~~~~~~~~~~~~~~~~~~~~~~~ Outline         Before coloring, erase the outlines of the eye enough so that you can see the basic shape, but the graphite won't mix.         I always fill in the pupil first. Simply color in the dot solid black. Any highlights overlapping the pupil should be stark white.          Coloring the iris depends on the color. For example, a brown iris should be outlined a very dark brown, and the top third should be that same brown.          In the middle third, slowly decrease the pressure while coloring down until you have a smooth transition from solid color to scraggly remnants. You should end with a color so light it blends in with the white.          The bottom third should be the second or third darkest brown. Pick a shade and repeat the steps used for the top, only going up instead of down. The middle third should now be overlapped by two shades o